Chapter 3: Data Management in the FEWS Tools Plugin
Summary
This chapter examines the data management in the FEWS Tools plugin for QGIS, including the different types of data formats used, downloading data, data availability, and data import/export using archives.
3.1. Data types
GeoCLIM uses four main data types: raster data in BIL format BIL (* .bil) and GeoTIF (*.tif or *.tiff), vector data in shapefile format (*.shp), tables in comma-delimited format (*.csv), and data Archives.
3.1.1. Characteristics of the raster dataset
A band interleaved by line (BIL) dataset contains two files: a (*.bil) file and a header file (*.hdr). The .bil file is a binary file that contains the pixel values (e.g., rainfall, temperature, etc.), while the HDR file contains the characteristics of the dataset, such as the geographic location, pixel size, and depth.
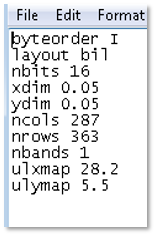
Figure 3-1 Example of a HDR file.
The header file is an ASCII text file; it can be generated or edited from a text editor (e.g., Notepad). For example, Figure 3‑1 shows that the header file contains information about the number of columns (ncols), number of rows (nrows), number of bits per pixel (nbits), and size of pixel (xdim and ydim), among others. Figure 3‑1 also shows the xdim and ydim values corresponding to the horizontal (x-dimension) and vertical (y-dimension) dimensions of a pixel with a size of 0.05 degrees, which is about 5 kilometers. The ulxmap and ulymap correspond to the x-axis and the y-axis coordinates of the center of the upper-left pixel of the raster image. There are additional keywords that the header could have (Figure 3‑2) (ArcMap 10.3 Help, ESRI). Sometimes, if the header file is incorrect, you may need to modify it so that the data is read correctly by the program.
NOTE: By default, the BIL dataset pixel type used is unsigned integers, unless the keyword "pixeltype" is used in the HDR file, and its value is "signedint".
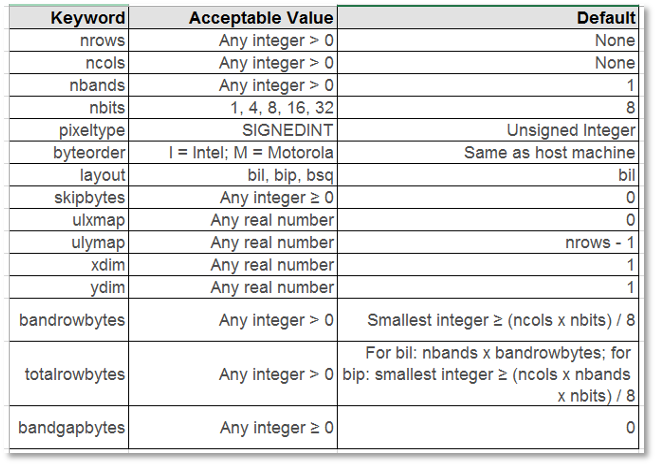
Figure 3-2 The header file is composed of a series of keywords and their respective accepted values. Source: ArcMap 10.3 Help, ESRI.
An important keyword in the header file is the pixeltype since it defines the type of value, unsigned (+), or signed (+ or -) a pixel could have. For example, rainfall data could only have unsigned (+) values since precipitation is only positive. However, if you look at the header file for CHIRPS, it uses signed values (+ or -) since the nodata value is -9999. In the example in Figure 3-1, the pixeltype is missing, so the program assumes that the data is unsigned; in the case of CHIRPS, we would have to add a new line on the header file defining the pixeltype as signedint. Another keyword to keep in mind is the nbits because it indicates the number of bits per pixel or the depth of the raster image (e.g., nbits=16 bit means that a pixel in the raster dataset can have any one of 216 = 65536 unique values). Figure 3‑3 (ESRI, Support 2016) shows a list of values a raster dataset could have depending on the pixel depth or nbits value.
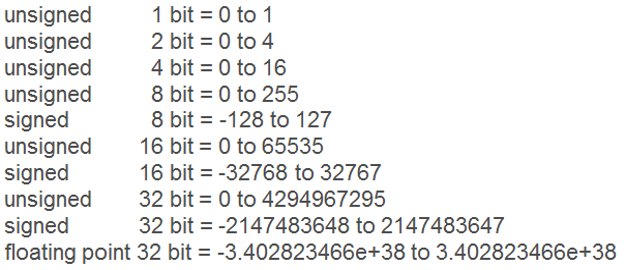
Figure 3-3 The range of values a dataset could store depends on the nbits.
3.1.2. Vector data
Another type of data used in fews_tools is vector data in shapefile format (*.shp). To get more information about how to open, create, or edit shapefiles in QGIS, see Intro to QGIS.
3.1.3. Tables
The GeoCLIM program uses tables in comma-delimited format (*.csv) as input and output data. For example, tables are inputs in the process of blending raster data with station values (BASIICS) or validating raster data. For the blending process, the CSV table must have columns for ID, latitude (lat), longitude (long), year, and time period (pentads, dekads, or months), such as the months of January-December in Figure 3-4. The ID, lat, lon, and year columns do not have to be in any order, and additional columns are permitted. However, the time-period columns need to be consecutive (Figure 3-4).
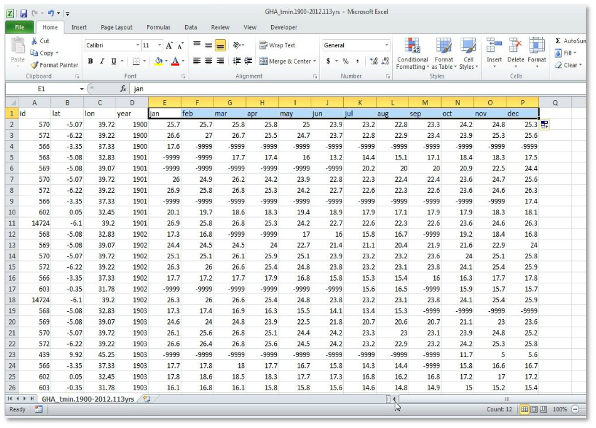
Figure 3-4 GeoCLIM accepts tables in comma delimited format (CSV).
3.1.4. Climate data archives in FEWS Tools
A climate data archive is a compressed file with the ending ‘.climdata’ that contains a group of files of a specific climatic variable. The Archive contains the necessary information to define the data in the FEWS Tools plugin. This is an easy way to save a copy of the dataset, or part of it, that has been defined in the tool or to share data between users. See section 3.4 for instructions on how to create an Archive.
3.2. Download data
GeoCLIM allows you to download data for those datasets that include FTP information on their definition form. To download data, follow the steps below:
Click on the Download Data by Date icon on the main toolbar. See red box in Figure 3-5.

Figure 3-5 To download data using fews_tools, make sure that the ftp information is included in the dataset definition. Click on the download icon and complete the form.
Select the dataset that you want. See Figure 3-6(1).
The Data Extent (2), Duration (3), and Parameter (4) should change accordingly.
Select the starting and ending date. See Figure 3-6.
Click OK to start the download. See Figure 3-6.
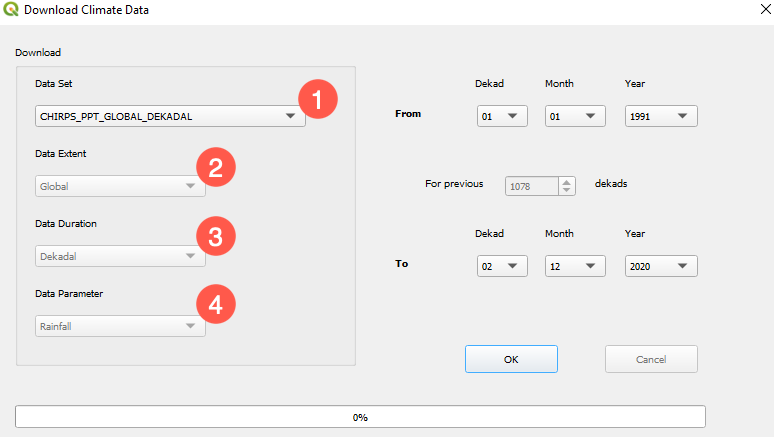
Figure 3-6 Download data by date for a selected dataset.
Global data: CHIRPS data are produced in two versions, a preliminary version that is available every five days, two days after the end of the pentad (2nd, 7th, 12th, 17th, 22nd, and 27th), and a final version that is released every month, on the middle of the following month, for example: the final data for April is available after May 15th. To conduct monitoring analyses, we combine the final available data and complement it with preliminary data.
The FEWS Tools plugin provides predefined settings to download final CHIRPS for global, Africa and Central America windows, see link below: https://data.chc.ucsb.edu/products/CHIRPS-2.0/
To download dekadal global preliminary CHIRPS:
https://data.chc.ucsb.edu/products/CHIRPS-2.0/prelim/ select the format *.tiff, *.tif or *.bil.
To download dekadal global final CHIRPS:
https://data.chc.ucsb.edu/products/CHIRPS-2.0/global_dekad/ select the format *.tiff, *.tif or *.bil.
3.3. Data availability/export data
The View Available Data function, see red box in Figure 3‑7 facilitates the following:
Display a list of files in your dataset
Display a list of missing files in the timeseries
Deletes files in the dataset.
Exports the dataset or part of it into a GeoCLIM archive or in same file format.
To check the available datafiles in your dataset click on the View Available Data icon on the main toolbar.

Figure 3-7 To view the data available to run the GeoCLIM/GeoWRSI functions, click on the View Available Data icon and select the desired dataset.
The function will open the information for the default dataset. Select the desired dataset from the pulldown menu. The Available Rainfall Data tool also allows you to identify the missing data in the time series, Figure 3-8. Click on List Missing Data to obtain a list of missing files in the time series. Select the complete or part of the dataset and click on the Export button to save the selected files into a data archive that could be shared with other GeoCLIM users. A data archive is a compressed file that includes all the files, selected on the Available Rainfall Data tool, together with the data-definition information.
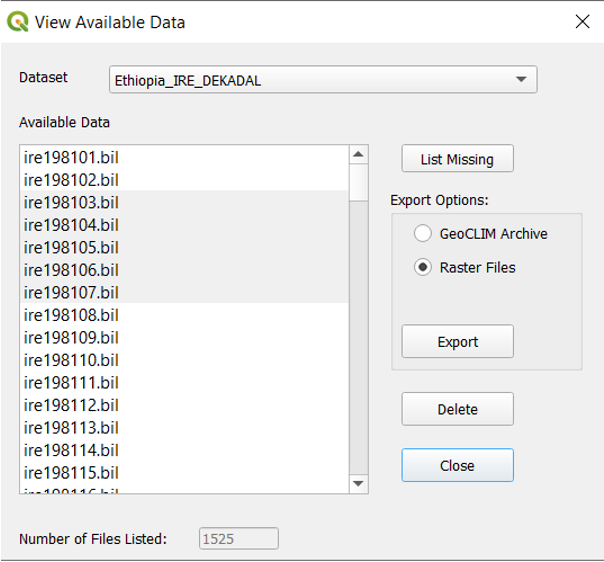
Figure 3-8 The View Available Data tool allows to list the data files in the time series for a selected climate dataset.
3.4. Create an Archive
To create an archive, follow the steps below:
Open the View Available Data tool.
Select a climate variable.
Select the entire or part of the time-series to be added to an archive.
Click Export.
Give a name to the new archive and click OK .
Select the destination directory.
Click OK . A new file with “.climdata” format is created in the destination directory.
3.5. Importing archives
To import an GeoCLIM archive, follow the steps below:
Open the Import Climate Data Archives tool from the toolbar. See Figure 3-9.
Browse to the archive to be imported and click Import.

Figure 3-9 Fews_tools allows you to share with other users a complete or part of a dataset using a data archive.
To ensure that the archive imported correctly, open the View Available Data function, and click on the dataset pulldown menu and select the new dataset.