Chapter 2: Settings
Summary
Before you start working with the FEWS Tools plugin, there are several settings to consider. First, you need to designate a workspace directory, which serves as the repository for all map-related files, and all the raster data that you download or create. Additionally, you must set the area of work (region) and the dataset that you are going to use to conduct your analysis. This chapter provides a detailed description on how to setup FEWS Tools including the following topics:
Workspace directory structure.
How to change the workspace.
How to change the default output directory.
How to add/edit a new climate dataset.
How to add/edit a new region.
2.1. Review of the workspace directory structure
Once the program is installed, the default directory (in Windows Vista, 7, and 10) is: C:\Users\<USER>\Documents\FEWS Tools_WS. Where <USER> is the Windows username. There are two subdirectories in the workspace directory: Output and ProgramSettings (Figure 2‑1). The Output directory holds all the results by default. The ProgramSettings directory contains the colors used for the output maps, the Data directory that contains climate data, shapefiles and masks, and all the files needed to run the WRSI. Figure 2-1 shows an outline of the contents of ProgramSettings.
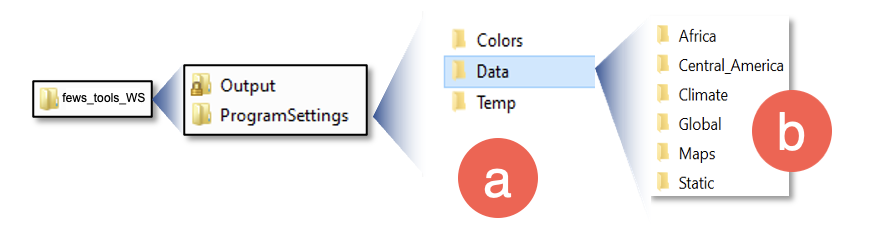
Figure 2-1 The FEWS Tools_workspace directory contains two subdirectories: the ‘Output’ where all the results are saved by default, and the ‘ProgramSettings’ that contains the ‘Data’ directory among others.
NOTE: The default path to climate data within FEWS Tools workspace is:
C:\Users\<USER>\Documents\FEWS Tools_WS\ProgramSettings\Data\Climate.
Contents of the ProgramSettings directory:
Colors: Contains color files for map legends produced by GeoCLIM.
Data: (Figure 2‑1(b)) contains the following directories:
Africa/Central_America/Global – Contain required files to run WRSI.
Climate – Stores all downloaded and imported data. See section 2.4 on how to make a dataset available for analysis in GeoCLIM.
Maps – Contains all the shapefiles for the maps of the regions and countries required by the different functions. You can add shapefiles/maps as needed.
Static – Contains the masks for the different regions. Masks are maps in raster format that are used to define the area of interest (region) and ignore the rest of the data. For example, FEWS Tools contains rainfall data for the entire continent of Africa, but the analysis may be needed only for the country of Kenya. The mask would have a value of 1, in the area of interest (e.g., land areas of Kenya) and a value of 0 (zero) outside the area of interest. The results from the different functions will be given only for Kenya.
Temp: This directory stores temporary files.
NOTE: Another important path to keep in mind is that of the FEWS Tools directory that contains all the program files. Make sure you back up the FEWS Tools.sqlite file that is inside the FEWS Tools directory.
c:\Users\[users]\AppData\Roaming\QGIS\QGIS3\profiles\default\python\plugins\FEWS Tools\
2.2. Changing the location of the FEWS Tools workspace
The default workspace is on the C:\Users\<USER>\Documents\FEWS Tools_WS, the C:\ drive is, sometimes, too small to hold all the data outputs that FEWS Tools produces. It is recommended that you change the workspace to another drive. This will only move the FEWS Tools_WS while the program files are kept on the original c:\users\[users]\AppData\Roaming\QGIS\QGIS3\profiles\default\python\plugins\FEWS Tools\ directory, mentioned above.
To change the workspace, follow the steps below:
From the FEWS Tools toolbar in QGIS, select the /Workspace Settings icon, see red box in Figure 2-2.
Browse to the new location in the Workspace Location field.
Click OK.

Figure 2-2 To change the workspace, select the workspace setting icon, red box, and define the new path.
NOTE: When changing the workspace, you do not have to create the “FEWS Tools_WS” directory in the new drive location. The tool will automatically create the directory inside the folder you choose. For example, if you want the workspace to be D:\FEWS Tools_WS, browse and select D:\.
2.3. Changing the default output directory
The plugin allows you to separate the results depending on the project you are working on by selecting the output directory. Click on the icon in the red box in Figure 2-3 and browse to the new directory.

Figure 2-3 The FEWS Tools plugin allows you to select the default output directory.
2.4. Making new data available for the FEWS Tools plugin
The FEWS Tools plugin requires climate datasets in raster (*.bil or *.tif, *.tiff) format. There are four ways of adding climate data to FEWS Tools:
By downloading existing data such as CHIRPS, CHIRP or any other datasets that comply with the required format.
By creating your own dataset. See chapter 9 for instructions on how to blend stations values with a raster dataset.
By interpolating climate stations. See chapter 9 for instructions on how to blend stations values with a raster dataset or how interpolate stations values only.
By importing a data archive, see chapter 3 on how to import archives.
Raster datasets in FEWS Tools are managed by the Add/Edit Dataset function; see red box in Figure 2-4.

Figure 2-4 To define a new dataset, complete the Add/Edit Dataset form.
If you select methods 1), 2) or 3), mentioned above, to add data to FEWS Tools, the dataset must first be defined in the tool in order to work with the different functions. Method 4) adds the data definition automatically; see Import Archives.
2.4.1. Define a new dataset in the FEWS Tools
The definition of a climate dataset includes the following:
The location and name of the directory containing the data
The name-format of the raster files
The missing-data value
Where applicable, the FTP information for the dataset updates.
To define a climate dataset, follow these steps:
Create a new sub-directory in the GeoCLIM data repository in
X:\FEWS Tools_WS\ ProgramSettings\Data\Climate\, (where X:\ is your drive, i.e., C:\ or D:\) and copy the raster data (tif, tiff or *.bil and *.hdr files) if you have them. Otherwise, if you are planning to download the data, we'll show you how to add the FTP information. Let's add the CHIRPS global dekadal dataset, as an example. To do this, create a new directory in the ..\climate data repository, called CHIRPS_PPT_GLOBAL_DEKADAL. The CHIRPS files are in the following ftp site:*.bil https://data.chc.ucsb.edu/products/CHIRPS-2.0/global_dekad/bils/.
*.tif https://data.chc.ucsb.edu/products/CHIRPS-2.0/global_dekad/tifs/. Visit the site to get familiar with the data format.
Open the dataset definition form by clicking on the Add/Edit Dataset icon, in the red box in Figure 2-4. If this is the first time you open the form, the information you see is for a default dataset. You could either copy the current dataset, by clicking on the Copy Dataset button, and modify the existing information to reflect the dataset that you want to define or click the New button to start entering the information for the new dataset.
Complete the Dataset Name, for this example, CHIRPS_PPT_GLOBAL_DEKADAL, (Figure 2-5(1)).
Default Dataset? Select Yes to ensure that all the functions will have this dataset selected by default, (Figure2-5(2)).
Data type, in this case it is Rainfall. (Figure2-5(3)).
Dataset Extent, select Global, (Figure2-5(4)).
Periodicity, select Dekadal, (Figure2-5(5)).
In the Current Data section (blue box in Figure 2.5), browse to the Data folder that you created on step 1, (Figure2-5(6)).
Define climate data file name as follows:
The file name in a climate dataset must have the following format:
<prefix> <date-format> <suffix>where:Prefixis a set of characters before the date that could be associated with the dataset name, descriptor, or source; (Figure2-5(7)).Date formatPulldown Menu: The date is composed of the <year> and <period of time (pentad, dekad, or month)>. The FEWS Tools program has a variety of pre-defined formats for the date; for example, YYYYMM corresponds to the 4-digit year followed by the 2-digit month (i.e., 01, 02, 03...12). The date formats available depend on the periodicity selected on (7) above. Try changing the periodicity and see how the date formats also change. See Figure2-5(8).SuffixPulldown Menu: The suffix corresponds to any character after the date, including the extension of the file (e.g., .bil) (Figure 2.5 (9)).
For example, to name the rainfall total for the 36th dekad of 1991 from CHIRPS 2.0, the name of the
BILfile is "v2p0chirps199136.bil." In this case, theprefixis v2p0chirps, to indicate that it is CHIRPS 2.0 data, thedate-formatis comprised of a 4-digit year (1991) and a 2-digit dekad (36), and the <suffix> is the extension for a BIL file including the "." (.bil).
Fill out the
Missing Value; for example, the missing value in CHIRPS is -9999 (Figure2-5(10)).In the Average Data section, green box in Figure 2.5, Click on the Match Data Folder button (Figure2-5(11)); this copies the path from the Data folder onto the Average Data folder to ensure that the long-term averages are saved into the same directory as the dataset files. This step becomes handy when Updating the GeoCLIM averages.
Fill out the
prefix,date-formatandsuffix(.bi, .tif, or .tiff) for the average files (Figure2-5(12)).The
missing valueshould be the same as defined for the current data, Figure2-5(10).The FTP Settings section, yellow box in Figure 2.5, contains the necessary information to download data updates. If the dataset that you are defining does not have FTP information, this section can be empty (Figure2-5(13)). To setup the FTP for global CHIRPS dekads https://data.chc.ucsb.edu/products/CHIRPS-2.0/global_dekad/bils/, follow the steps below:
Add the name of the Remote Host https://data.chc.ucsb.edu/ . (Figure2-5(13a)).
Add the Remote Directory where the data are located /products/CHIRPS-2.0/global_dekad/bils/. (Figure2-5(13b)).
Add “anonymous” as the User Name. (Figure2-5(13c)).
Add “password” as the Password. (Figure2-5(13d)).
Enter the Date Format for v2p0chirps198101.tar.gz. In this case, use 4-digits year; 2-digits dekad. (Figure2-5(13e)).
Enter the file Zipped Prefix, in this case “v2p0chirps”, and suffix “.tar.gz” (Figure2-5(13f)).
The Uncompressed Data Projection is “geographic.” (Figure2-5(13g)).
The Scale Factor (Figure2-5(13h)).
The Uncompressed Date Format in our example is 4-digits year; 2-digits dekad. (Figure2-5(13i).
Enter the Uncompressed Prefix and Suffix, “v2p0chirps” and “.bil” respectively. (Figure2-5(13j).
Once the form is completed click on the Save button. See chapter 3 for how to download data.
The complete Define Climate Dataset form for *.bil data should look like Figure 2-5. Figure 2-5(a) shows the form for data in *.tif or *.tiff format.
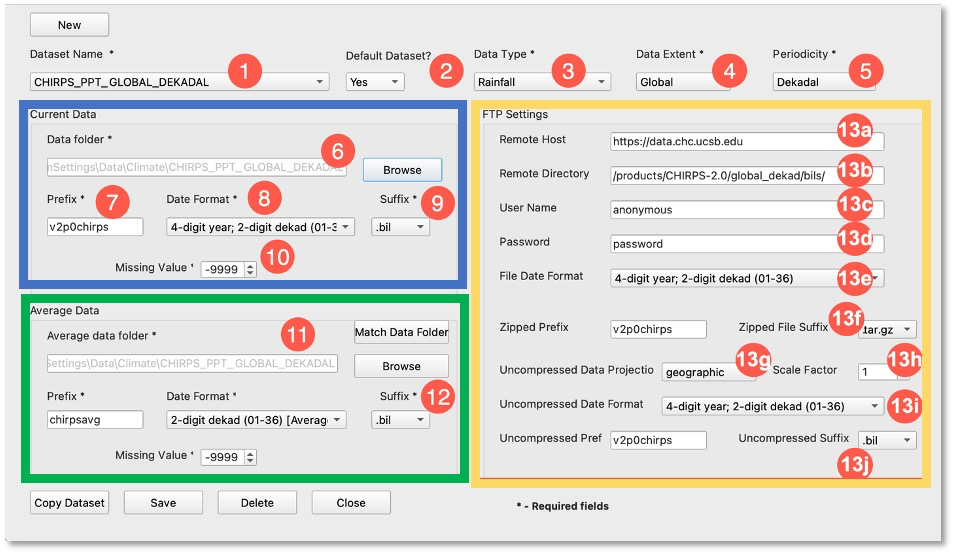
Figure 2-5 All datasets must be defined before they can be used in FEWS Tools.
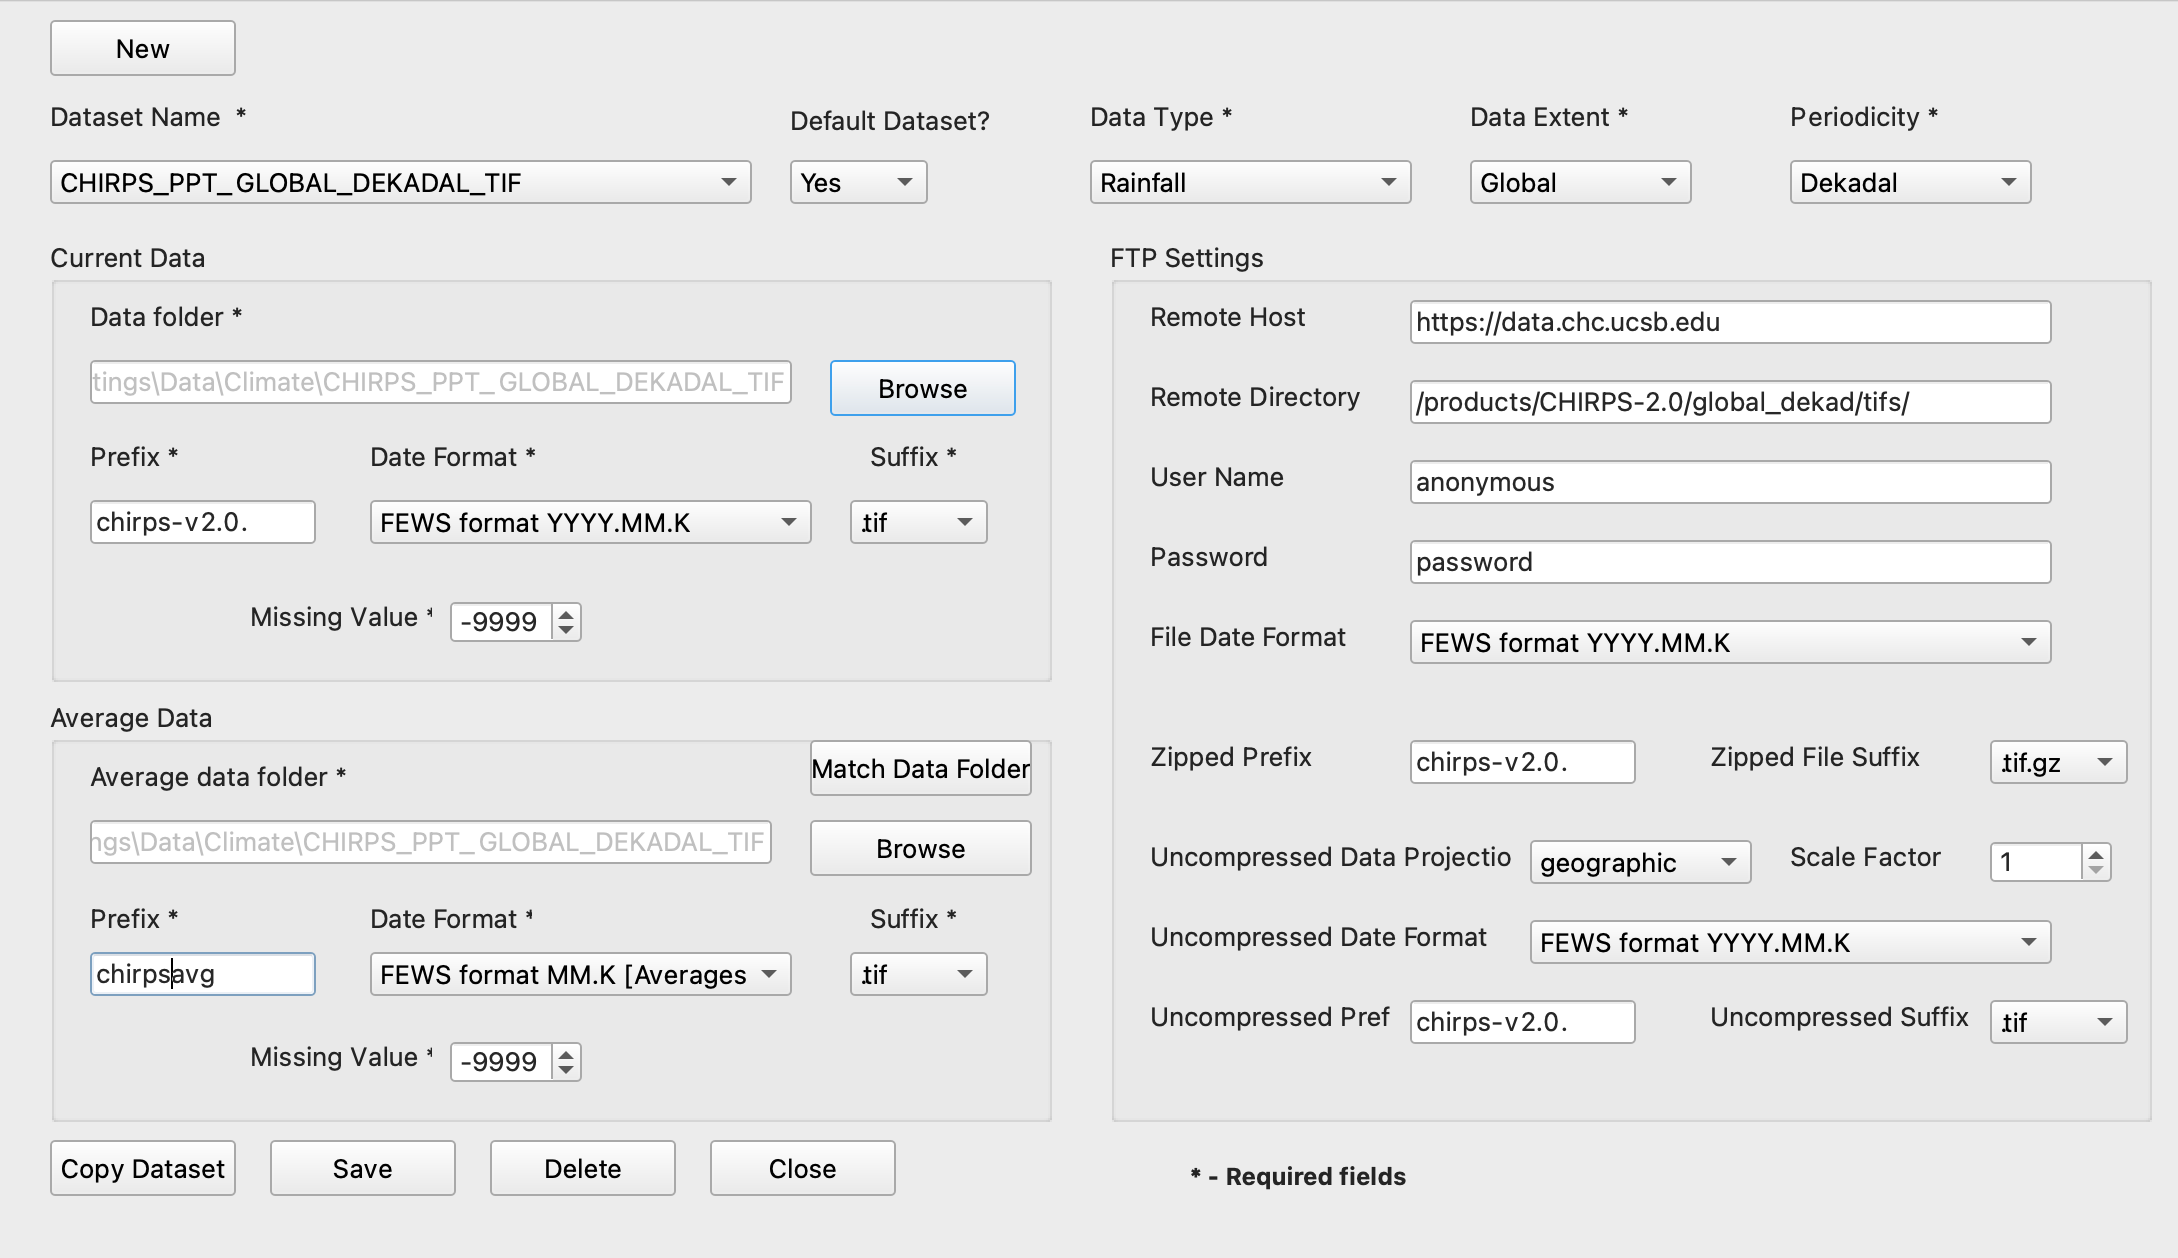
Figure 2-5-a This is an example of the complete form for the definition of data in *.tif format to be used in FEWS Tools.
NOTE: To learn more about the data formats used in FEWS Tools, see chapter 3.
2.5. Regions
The FEWS Tools work on specific areas of interest called Regions. The definition of a Region includes the maximum/minimum latitude and longitude, a default mask, and a set of vector maps that delineate the Region. A region could be defined to work with both GeoCLIM or GeoWRSI functions. There is a set of predefined regions in the tool, but you can always define a new one. Figure 2-10 shows the complete region form.
To define your own region, you must have the following information ready.
To work with climate data only:
Maximum and minimum latitude for your area of interest.
Maximum and minimum longitude for your area of interest.
A mask file, a raster file with value of 1 for the area of interest and “0” for the areas outside (see how to create a mask on section 2.5.1).
A polygon shapefile that delineates the area of work (i.e., watershed boundaries, administrative unit, country, etc.)
At least one polygon shapefile to overlay the results.
To work with WRSI, add the following:
The period number for dekads (1 – 36) for pentad (1 – 72), when the average start of season occurs
The dekad number when the average end of season occurs
A raster file with the dekad number for the start of season
A raster file with the climatological WRSI
A raster file with the water holding capacity
A color file for the start of season
2.5.1. Create a new region in FEWS Tools
To define a region to work with GeoWRSI, see chapter 11.
To define a new region in GeoCLIM, follow the steps below:
Open the Define Region form by clicking on the Add/Edit Region button, see red box in Figure 2-6 below.

Figure 2‑6 Select the Add/Edit Region icon to define a new region.
Once the form opens (see Figure 2-10), it shows the information for the default region. You could either copy the region by clicking on the Copy Region button and edit the fields with the new information, and save it as the new region, or click on the New button. For example, let's create the region for Central America and the Caribbean including the northern part of South America, see area in black in Figure 2-8 below. To do this step, a polygon shapefile was prepared covering only the area of interest.
Region Name: Add the name for the new region and click ok.
Set as Default? Select yes to ensure that this region is selected when you open any function.
Comments Add any information to help describe the region.
Enter the minimum and maximum latitude and longitude for the new region. In our example, we are using the lat/lon for Central America and the Caribbean. This step could be done in two ways:
Entering the values by hand.
Extracting the coordinates from an existing map as follows: Click on the Get Extent from Map and select one of the GeoCLIM geographic options offered by default. For our example we select the shapefile for the region of interest. The tool retrieves the coordinates automatically, see figure 2.7.
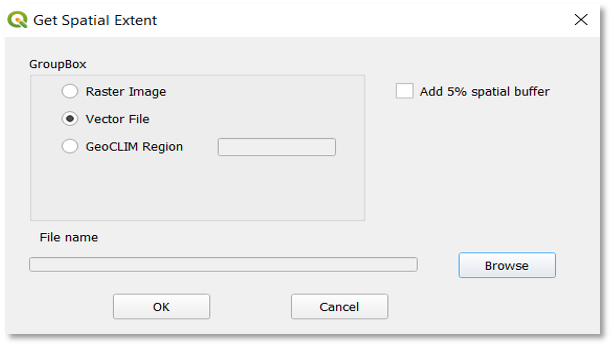
Figure 2-7 The coordinates for the region could be obtained from an existing map.
Cell Size: Enter the output cell size, in the case of CHIRPS it is 0.05 decimal degrees.
Mask File: Browse to
X:\GeoCLIM\ProgramSettings\Data\Staticto select the mask file. If you do not have a mask file, you can create one at this point. Masks are raster images that are used to include only the desired area of interest in the analysis and ignore the surrounding areas. A mask is a raster dataset with pixel-value of "1" for the area of interest and "0" for outside of it. The mask facilitates the execution of the algorithms on the areas where the pixel value=1 while excluding areas where pixel values=0. You can create a mask using a shapefile of the area of interest (i.e., administration unit, watershed, etc.) following the steps below:On the region definition form, click on the Import Mask from Vector button to open a new form.
Browse to select the shapefile for the area of interest, in our example the shapefile is
CentralAmerica.shp, see Figure 2-8.

Figure 2-8 The mask defines the area of interest. The black zone shows the mask for Central America, the Caribbean and the northern part of South America.
c. Browse to save the output mask in the ~\FEWS Tools_WS\ProgramSettings\Data\Static directory. The program gives the name automatically, see Figure 2-9. Make sure that the Outside the Map Polygon is selected.
d. Click Import to create the mask.
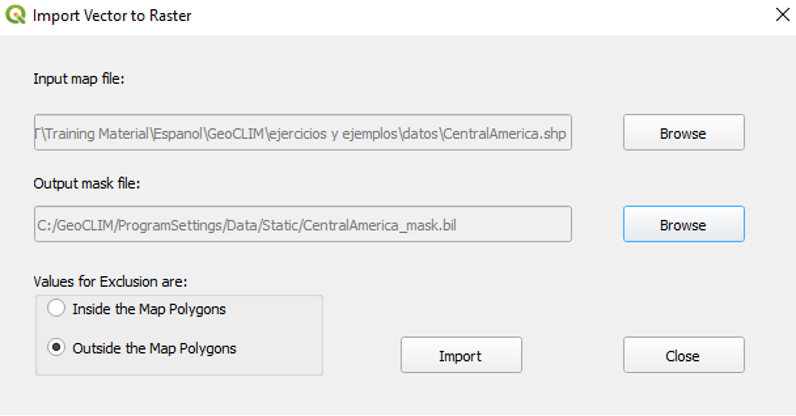
Figure 2-9 The mask file facilitates running the GeoCLIM functions for specific areas of interest.
Map File: select a vector layer in shapefile format depicting polygons related to the region of interest, such as political boundaries, watersheds, etc. The map file is overlaid on the product. A second map file is optional.
Click on Save to keep your new region.
You are now ready to work with GeoCLIM functions. See Figure 2-10 for an example of a completed form and Figure 2-11 for an example of the result (average rainfall) using this region. The image shows the Central America and Caribbean region (lat/lon), the analysis result is limited by the mask.
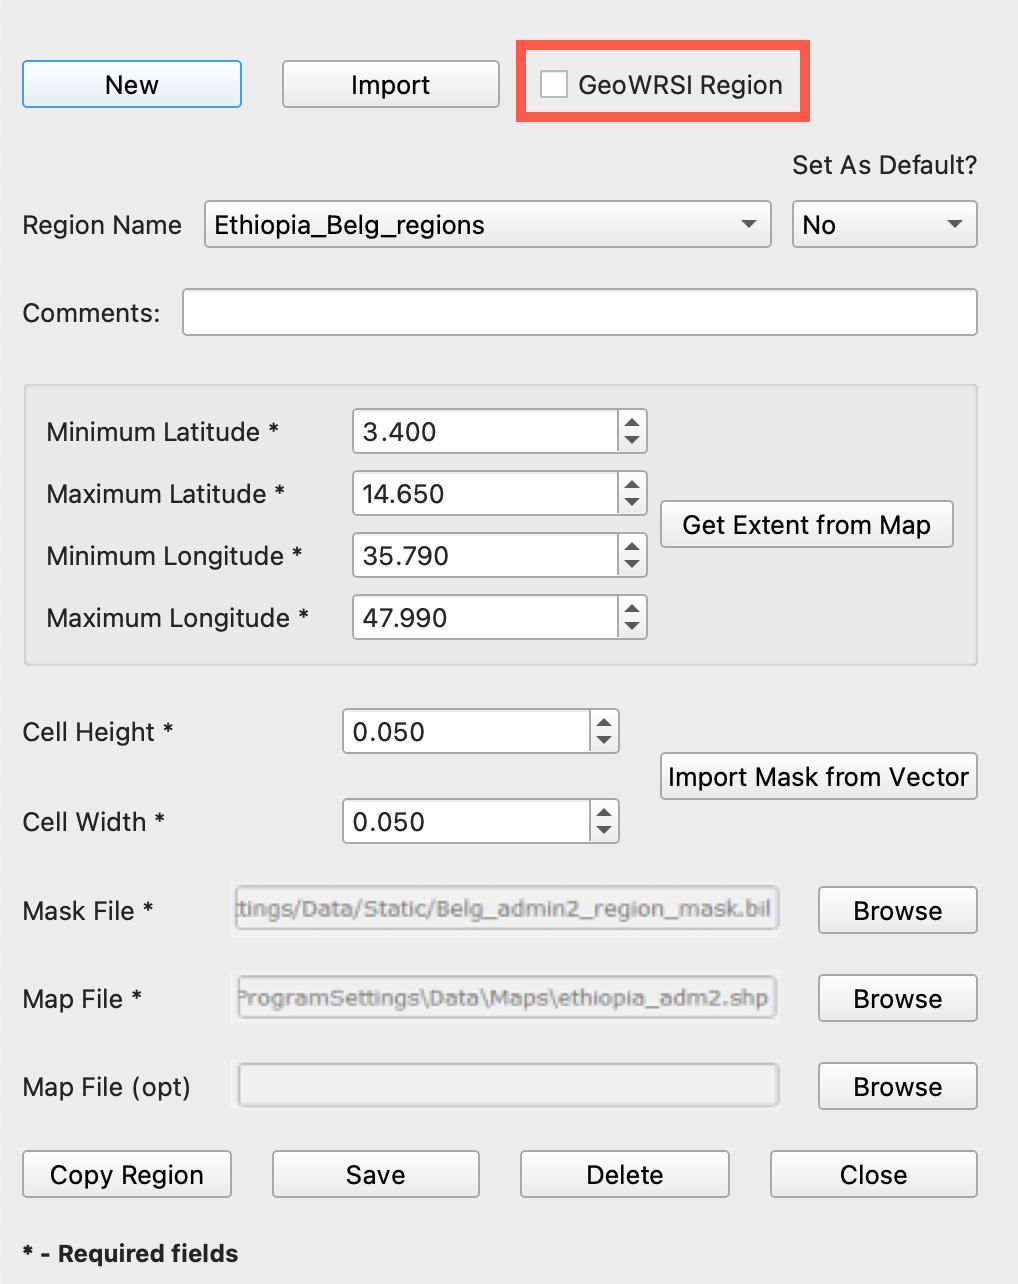
Figure 2-10 GeoCLIM runs on specific areas of interested by lat/lon and a mask file, called Regions. You can add/edit WRSI parameters by selecting the GeoWRSI Region checkbox (see chapter 11).
NOTE: Use the Import button, on the data Definition form, to import regions used on the Visual Basic version of the GeoCLIM.
Global data: CHIRPS data are produced in two versions, a preliminary version that is available every five days, two days after the end of the pentad (2nd, 7th, 12th, 17th, 22nd, and 27th), and a final version that is released every month, on the middle of the following month, for example: the final data for April is available after May 15th. To conduct monitoring analyses, we use the final available data and complement it with preliminary data.
The FEWS Tools plugin provides predefined settings to download final CHIRPS for global, Africa and Central America windows:
https://data.chc.ucsb.edu/products/CHIRPS-2.0/
To download dekadal global preliminary CHIRPS:
https://data.chc.ucsb.edu/products/CHIRPS-2.0/prelim/ select the format *.tiff, *.tif or *.bil.
To download dekadal global final CHIRPS:
https://data.chc.ucsb.edu/products/CHIRPS-2.0/global_dekad/ select the format *.tiff, *.tif or *.bil.
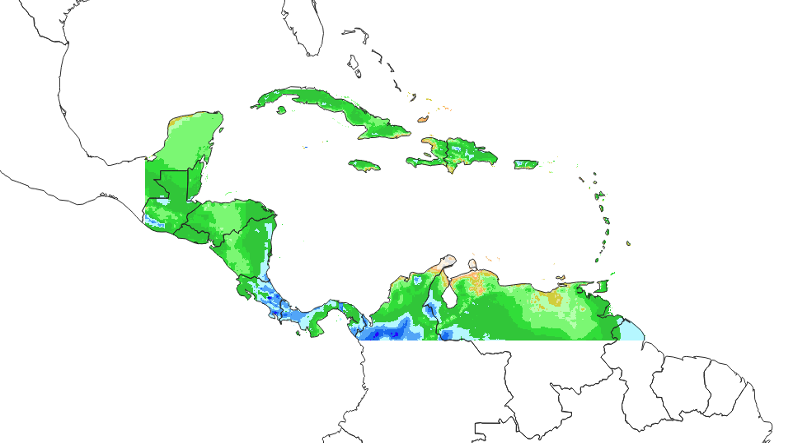
Figure 2-11 The mask file defines the area of work. In this example, the region and mask cover the area in color.
NOTE: The size of the region must be smaller or equal to the size of the climate dataset. Otherwise, the region becomes unavailable when selecting the dataset. In other words, if you do not see your region in the pulldown menu, after selecting your dataset, it may be because the geographic extent of the region is bigger than that of the dataset.
2.6. The FEWS Tools database: fews_tools.sqlite file
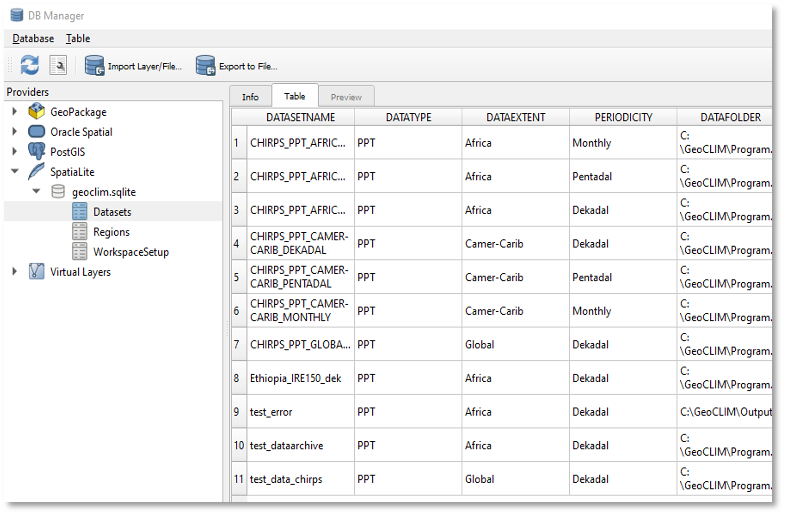
Figure 2-12 You can see the content of the FEWS Tools.sqlite file on the Database pulldown menu on the main QGIS toolbar.
The fews_tools.sqlite file that is found in the fews_tools directory in the following path c:\Users\[user]\AppData\Roaming\QGIS\QGIS3\profiles\default\python\plugins\fews_tools\ holds all the changes mentioned in this chapter such as workspace changes and all the datasets and regions that you add or edit. You can see the content of the fews_tools.sqlite by clicking on the Database pulldown menu on the main QGIS toolbar. Select the DB manager and open the SpatialLite/fews_tools.sqlite. Please explore the content of the file; see Figure 2‑12. Remember that all changes must be done through the settings in the FEWS Tools main toolbar. Please backup the fews_tools.sqlite file periodically to ensure that you have all the settings saved.
NOTE: Sometimes the directories to the fews_tools folder are hidden. In this case, go on the file explorer path, and type the next directory. You should be able to see the next directory in the list. Continue selecting directories until you get to fews_tools.
NOTE: For existing users of QGIS/GeoCLIM, (for versions before 3.1), place the geoclim.sqlite file that you have saved, into the fews_tool directory after installing the new version. Restart QGIS, follow the instructions and all the content in the Geoclim.sqlite file will be copied to the fews_tools.sqite file. After that, back up only the fews_tools.sqlite file to save your settings.
2.6.1. Connecting the FEWS Tools.sqlite file
In case the fews_tools.sqlite file does not show on the QGIS DB_manager/SpatiaLite menu, connect it as follows:
In the QGIS main Menu, select Layer/Add Layer/Add SpatiaLite Layer, see Figure 2-13a below, to open the Data Source Manager SpatiaLite dialog box.
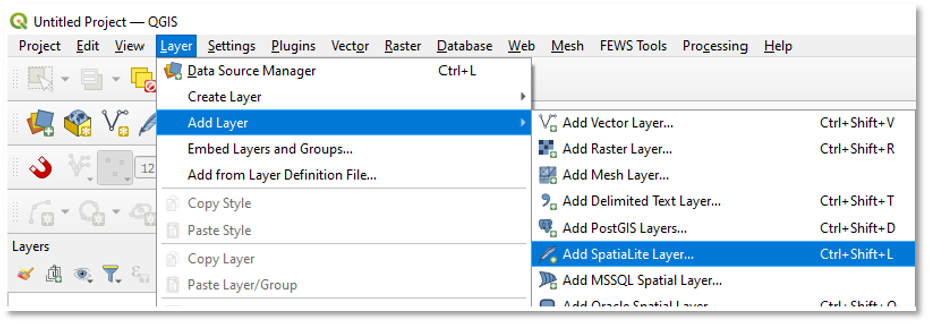
Figure 2-13a To add a new SpatiaLite file to the DB_management, select Layer then Add Layer.
Click on New button, navigate to the fews_tool folder (C:\Users\Pedreros\AppData\Roaming\QGIS\QGIS3\profiles\default\python\plugins\fews_tools) then select fews_tools.sqlite file and click on OK button, see Figure 2-13b.
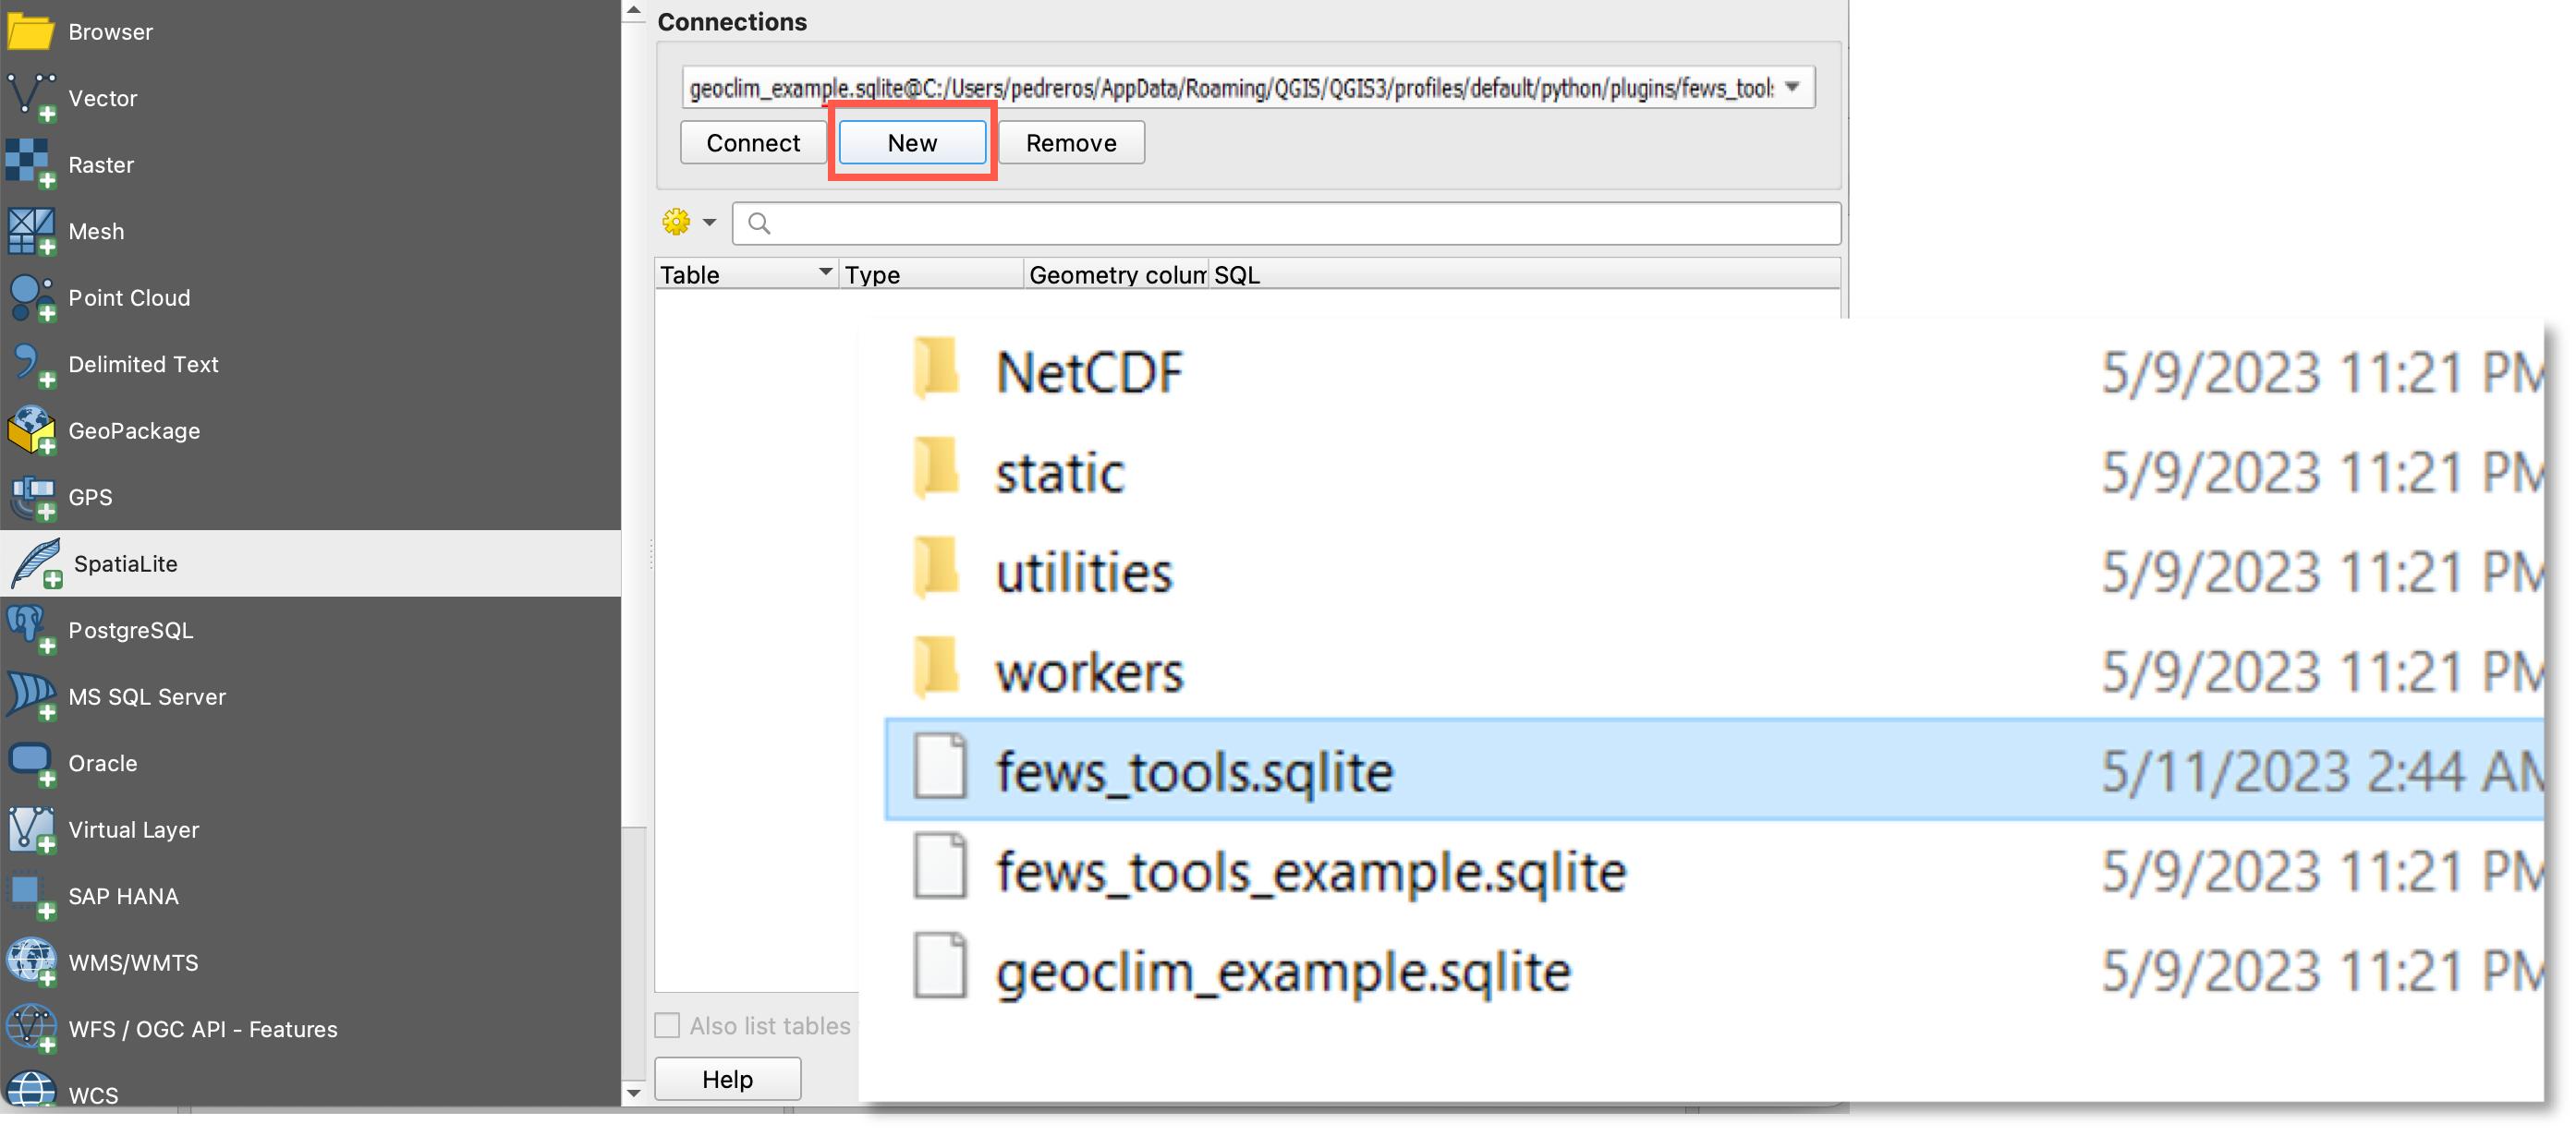
Figure 2-13b Select New and navigate to the fews_tools directory and select the fews_tools.sqlite.
Click the Connect button, then the Close button.
From QGIS main menu, select Database>DB Manager to open the DB Manager dialog box.
Open SpatiaLite, then
fews_tools.sqliteto view its content.